This site will be rebranded as Buildingology.org. This was long overdue, but the content will not change. I will post the links to the youtube videos soon. A couple of videos have already been published.. Not everything is switched over yet, but if you see a redirect to buildingology for some pages, that is still me.
I have been trying to put this project together for quite some time now, but just have not had the time. There will be some major changes. I am still working on editing a number of videos which will be more of a focus of this project. I will still write some articles, but they will be based on content in the videos.
I hopefully will be able to release my first within the next couple of months. We will see how this goes.
I have shot a few videos on a few topics, some are around the house type topics, and others are building science fundamentals type. I just need to edit them. When they are ready, I will post them, but they are coming.
I have been pretty busy over the last year and only recently have had some free time to post content. I wish I had more time for this. Articles will come, but I will try to focus on more video content based on the fundamentals of building science (education styled content) in addition to how-to videos. A name change is in order too! I figured the education styled content should be geared towards the homeowner, so I will leave out the really nerdy stuff only building scientist content. Mostly. I have already started on the structure of how the videos will go. It should be fun, and looking forward too it.
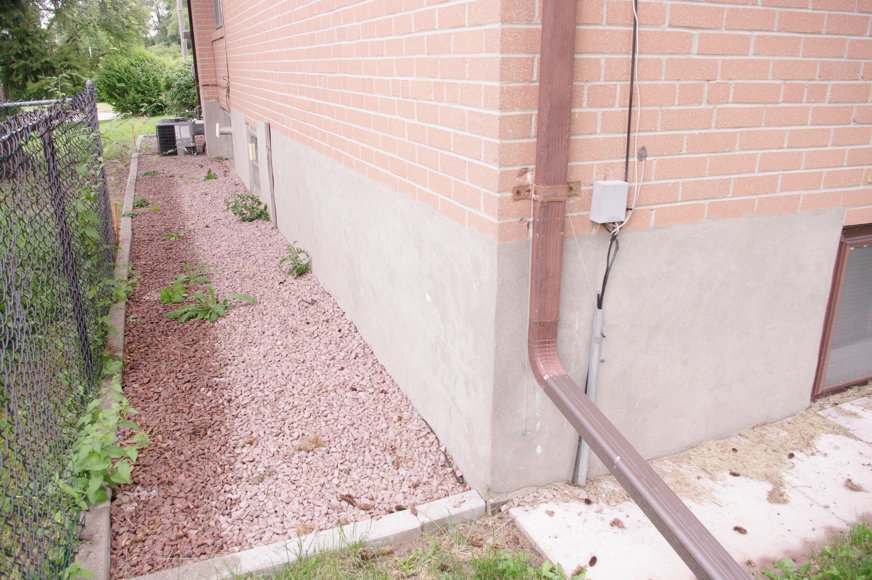
This is the side elevation of my post WW2 home facing the street that had some basement foundation issues. But what is the failure mechanism that is leading to the mysterious wet spot discovered in this article? Only an investigation will tell the tale.
Is it really that strange that drywall should get wet after a heavy rain event? In some homes it is all too common unfortunately if you have poor site drainage, poor waterproofing or a myriad of other reasons. Sometimes a wet spot on drywall occurs along the foundation walls. In my case, after two heavy rain events in the summer of 2013, a wet spot first appeared not on the exterior wall, but on an interior partition wall in the center of the basement floor plan about 8 feet in from an exterior wall. After a few hours, the wet spot bloomed to about 3 feet in diameter. There had been damage in this location before from years before, but no issues had occurred up to this point that warranted action within the time I was living there. The floor below the wet spot was also damaged.
This was a real head scratcher. Why would a rain event cause a wet spot in the centre of the house? During the course of that rainstorm I looked for some visible leakage paths but found none. Not being able to come up with an answer, this is when the investigation began, and I broke out my toolkit.
Warning: this post is picture heavy
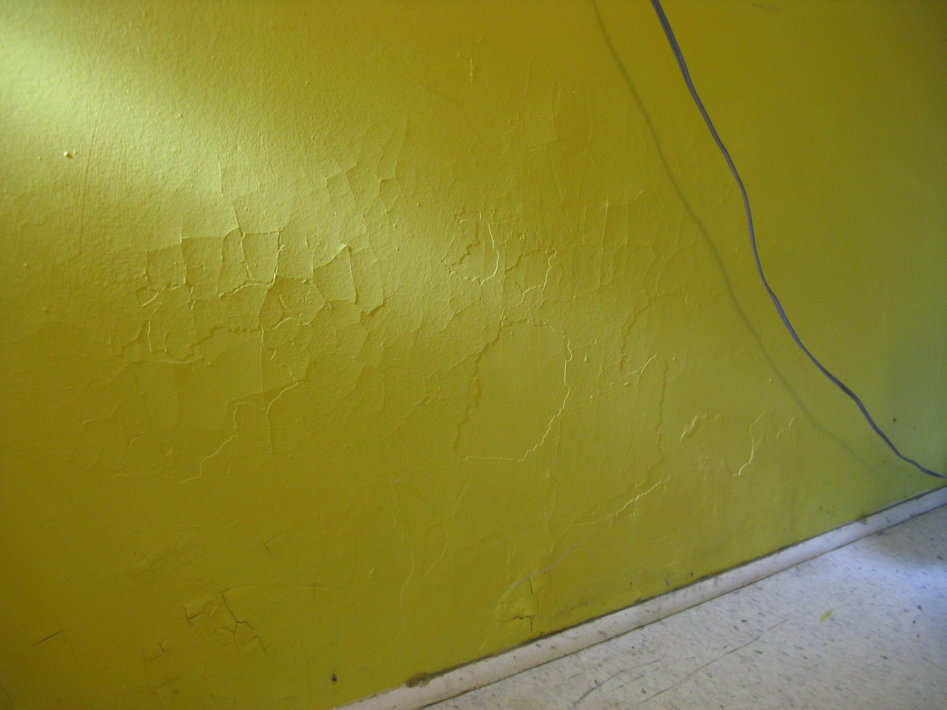
This is the utility room. On the left, about 8 feet from the exterior wall is where a wet spot occurs during a rain event. The plaster started to crumble off of the gypsum board underneath and fell onto the floor. The exterior wall also shows some damage with plaster falling off the the exterior wall. The floor was damaged before this incident from a leaky washing machine. This is proof the VCT tile installations need to be sealed, or the mastic adhesive will leak out of the joints when wet. A crack in the exterior foundation wall can also be seen about 2-4 feet away from the exterior wall damage. It is possible that the crack is responsible for part of the exterior wall damage, but not at the interior partition.Here is the other side of the utility room wall. Apparently damage had occurred in the past, only to be covered up with a nice coat of paint, easily seen by using my flashlight at an angle.
The investigation Begins, advice taken from foundation experts.
To determine the point of entry on the using a moisture meter, I measured the moisture content using a grid pattern on graph paper and determined where the readings were highest. The first of the two rooms, the utility room attached to the partition had plaster troweled on the exterior wall and the readings were elevated near the bottom of the wall in comparison to shoulder height, but the levels were not alarming at that moment in time. This seemed reasonably normal that the footing should have higher readings for the troweled on plaster. From the utility room photo above it is possible to see some locations where plaster has delaminated from the concrete block wall. Even though moisture levels were currently elevated, they must have once been even higher . In the adjacent room was a kitchen. Under the sink, the air had a 15-20% higher relative humidity than the room itself, and the gypsum board under the sink was also elevated to alarming levels. This did not look good, and was not possible to solve the issue definitively without more aggressive measures or exploratory openings. It was time to call in a foundation company.
I showed three foundation companies the evidence I had gathered. One of them was dumbstruck. Two of them immediately gravitated to a crack that was present near the foundation wall in the utility room in the picture shown above. However the location of the crack had a low moisture concentration in comparison to other areas recorded on the graph paper. These companies didn’t seem to be interested in any other sort of their own investigation, not even a simple walk through. They just wanted to start digging. After their pitch was done, I showed them the door.
As they left, I determined that they only way it would be fixed properly is if I solved it myself. I’m glad I did it myself, or the problem would have never been solved. The plan was after I finished my graduate studies, the project would begin.
If you dig, use a backhoe if it fits on your site. Worth. Every. Penny.
Backhoe? In this case, it would have damaged a spruce tree on the adjacent property as some roots were on the surface. The plan was to dig the area outside according to the elevated moisture grid on graph paper I gathered from the inside plaster and finish the exterior wall by modern standards. After excavation was to be completed, the weeping tile was to be scoped with a camera by a drainage company. With the help of hired labour, three people dug a hole six feet down and 18 feet across. It took us a few days and with no exaggeration, the hardest work in my life. The house had an elevated first floor, so the foundation footing was going to be approximately six feet down instead of eight. The location of the crack discovered from the interior is shown here on the exterior shown below in red It appears that there was a futile attempt in the past to patch the crack on the surface shown by the blue arrow. The mortar patch job can be seen spilling over the joint.
The clay tiles are beginning to be excavated at this point. The red dotted line shows the crack line that was discovered on the inside. The blue arrow shows an attempt at mortar repair on the surface took place at one time.The weeping tile is in good condition and the debris is minimal, no shifting. So far so good.
What is that?
As the digging down was almost complete, old clay weeping tile sections were removed only after they were checked for deficiencies, as after all I was looking for a smoking gun. The tile sections were good condition and the inside was not clogged. So far so good. As all of them were removed to look further down the line and something strange was discovered. There was a clay tile inside the footing going towards the interior of the house (shown below). The location of that clay pipe is slightly below the grade of the weeping tile. Most likely, all of the water passing through this point will pass through the house rather than around it to the storm water system exit location. I wondered if the difference in elevation was done by design or settlement of the foundation walls had occurred.
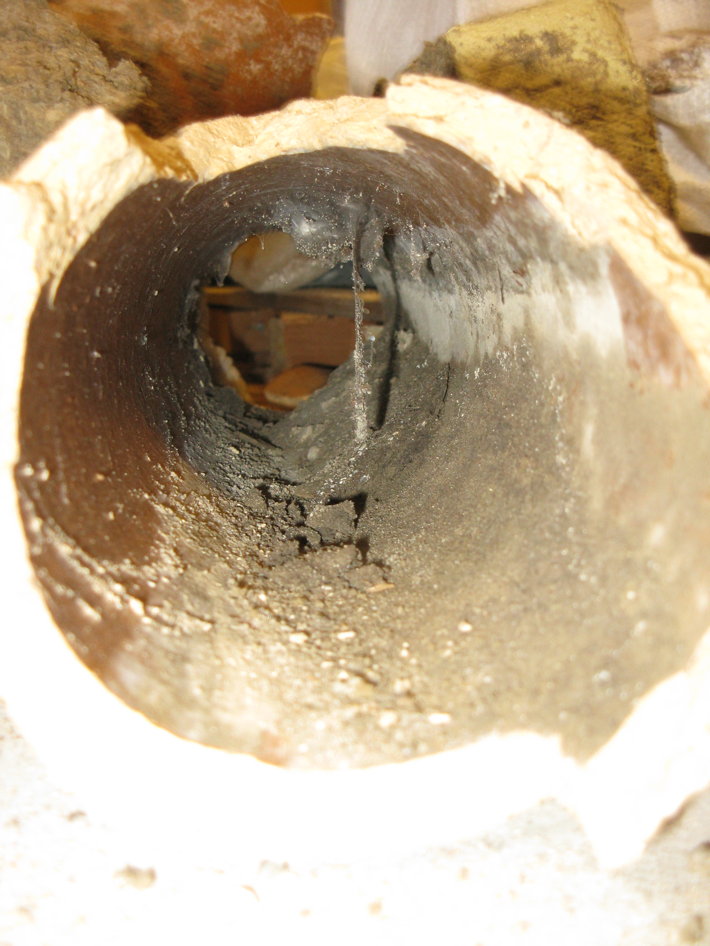
Down the rabbit hole. This is the mysterious pipe that was in the weeping tile system that entered the house. The red line represents the proper path of water in the weeping tile system moving towards the front of the house. The blue arrow shows that this newly discovered pipe is lower than the rest of the weeping tile system. This can only mean that most of the water that passes through this intersection ends up not outside, but inside the house.
The next step was to look inside this rabbit hole as shown below. With the aid of a mirror and a camera, it was possible to see about 3 feet in as the clay tile turned about 45 degrees or so towards the utility room. It was possible it turned in the direction of the unexplained water spot in the centre of the floor plan. At this point, it was time for the drain company to scope the whole weeping tile system, and possibly see where the rabbit hole leads to.
Looking through the rabbit hole into the house: At only 3 feet in, the direction of the pipe changes. Even with the aid of a mirror and a camera, it is difficult to see beyond a pipe than turns 45 degrees.
Prognosis
Three hundred dollars later, the camera inside the weeping tile was able to see that the exterior portion of most of the weeping tile system was clear of obstructions. No pipes were crushed but some minor shifting had occurred downstream beyond the project area by 20 feet as the pipe turned around the outside corner of the house. This info was good to know for future reference as it too will need to be replaced, but not an immediate concern. Back inside the house, it turned out that the 45 degree pipe was partially crushed, shifted and had a blockage, a trifecta for leaking water into the ground. This pipe was also tied into the main floor drain in the utility room that ran only 2 feet from under the wet spot. From the diagram below, it is easy to see how a shifted pipe can be just as be just as bad as a blockage. I had both.
If a clay weeping tile shifts position then the tile in front of it could dam the water behind it as shown on the top. For low water quantity flows, this damming lets the water sit in place long enough for it to seep into the the ground. In this case, the condition is not as bad as a crushed tile and/or blocked tile as shown on the bottom which allows for more leakage paths into the ground. This is also the reason why clay weeping tile should be replaced if at all possible to avoid these two scenarios.Here is one of the removed crushed glazed tile sections. High water line can be seen inside the the tile.
Window sill pan flashing has already been installed with a custom made back dam on site in this picture.
There are many different methods and materials that can be used to flash a window. I will show you some of the advantages and disadvantages of each, and the the creative solution I developed, and why I think it is one of the better ways of flashing your window. This post will not cover fluid or trowel applied membranes
There are generally two categories of of sill pan flashing:
Plastic kit sill pans
This method uses a piece of formed plastic to fit on top of your house wrap weather resistant barrier (WRB). They are sold in kits by various manufactures. It is important to order one that includes a back dam. A back dam ensures that any water that falls on top of your sill does not move towards the interior.
Here you can see the lip of the back dam preventing any rain water from entering the interior
Kits usually come in two or three pieces. I believe the two piece kits are better because they don’t have a seam near the corner of the window which can be a problematic area for leaks. I’m not saying the three piece kits are bad, it is more like extra insurance. These plastic kits must be taped or sealed with compatible sealant (caulking). If you use any old off the shelf sealant, it most likely not bond or melt the plastic or WRB. I used Dow Corning’s 758. (It is now a favorite of mine as it has many uses). These dams still have to either be flashed or sealed to the substrate.
This method was how I was originally planning on flashing my pan, but I learned the hard way that you have to order ahead of time to obtain your flashing…… many weeks ahead of time to have the pan arrive on your front door. In some areas of the country, your local independent building supply yard may supply these. I had a lot of trouble finding them in Toronto or even in the rest of the country for that manner.
One major advantage these pans have in comparison to tapes or membranes is that there is less build up in the corners.
One major disadvantages is that you must know the exact installed depth of your window because the back dam can interfere with interior finishes or not sit all the way behind the window.
Membrane and/or tape method
Self-adhered membrane
This is a very common method used. A bituthene membrane or Henry/Bakor’s Blueskin membrane is another option which is about 0.9mm thick. Be sure not to use the below-grade version which looks almost identical and is almost 1.5mm thick. This brings us to a disadvantage of using these types of membranes, it’s thickness. The buildup can change the dimensions of your frame in the corners very quickly if you need to put 2 or 3 or even 4 layers of overlapping material to your frame. You need to account for this when measuring your window.
Another disadvantage of using this membrane is that some substrates require priming for the bituthene membrane to bond to it. The primer is a messy nasty process. When attached to your WRB, these membranes also have a tendency to peel under its own weight over the years, so you still have to flash seams at the top with flashing tape. Reading the technical data sheets before using it is a must.
The biggest disadvantage is when using this method is that you need a sill angle in place or some other method to act as a substrate for the back dam so that the blueskin has something to adhere to. Without a back dam, this method is a deal breaker for me. A back dam is cheap insurance to a real potential issue.
Why would someone use this? You can cut it to size on site, no worrying about ordering ahead of time and it is a very durable, effective material if used properly.
Tape
When I hear the word tape, there is a negative connotation that goes with that word. Most likely due to previous experience of tape not adhering well to substrates in general. Flashing tapes are very thick in comparison due other tapes making them more durable There is also far more adhesive than any other tape most of us are familiar with. Their thickness however is nowhere near a bithuthene membrane. These tapes stick well and stay stuck. There are many flashing tapes on the market for this specific purpose. I choose the 3M flashing tape 8067/3015 for this project due to availability and a few other properties, and what a great choice it was! The 3M flashing tape is thick and tough enough to be used as a sill pan material. I want to point out that I have no affiliation with 3m for using their product. I’m just a fan.
The tapes have a release paper for easy installation that is discarded. The 6″ version which is the best width for window flashing in my opinion, has two release tape strips which come in handy during the install. The tape can also be used over the nailing flange of your window.
Of course the one downside of using this product is it also has no back dam. I can show you how to solve that problem and create your own back dam instead of using a sill angle material, which is easy to create.
Use flashing tape and create your own custom back dam
The trick to having a back dam while using tape is the flashing tape needs to stick to something, but minimizing the profile of other materials is desired because it should not interfere with the installation of interior finishes or brick mold. The best material I could think of was using a self-adhered closed-cell foam gasket. 1/8″ high is high enough for a back dam. I got the smallest width possible which was 1/4″. After measuring the window frame, the gasket was self adhered to wood, coming up about 2″ on either side.
Here is the foam gasket being fully adhered to the plywood substrate. It is 1/8″ high and 1/4″ thick. Note that the end is extended up the jamb
Here is the key to making this work: Only remove one side of the release paper, leaving the other one still on. This will allow you to adhere it to your WRB if it is not already installed in place. Take the edge of the tape and place it on top of the foam gasket. The tape is best adhered to the wood using a J-roller, but other methods can be used to press the tape in place to fully adhere it.
Here the back dam is now created with the foam gasket and only one side of the release paper has been removed from the tape. You can see that the tape is opaque on the side with the release paper still attached. It will be removed later. At the jamb/sill intersection, the paper can now be cut along the red line in preparation for the next step.
The recommended installation video provided by 3M is not wrong as there are many ways to flash a window, but the sill detail could be slightly better. The method to seal the sill is okay, but the sill connection to the jamb needs a slight adjustment in the way it drains. It is important to practice the 4D’s of moisture management in a building enclosure as best as possible.
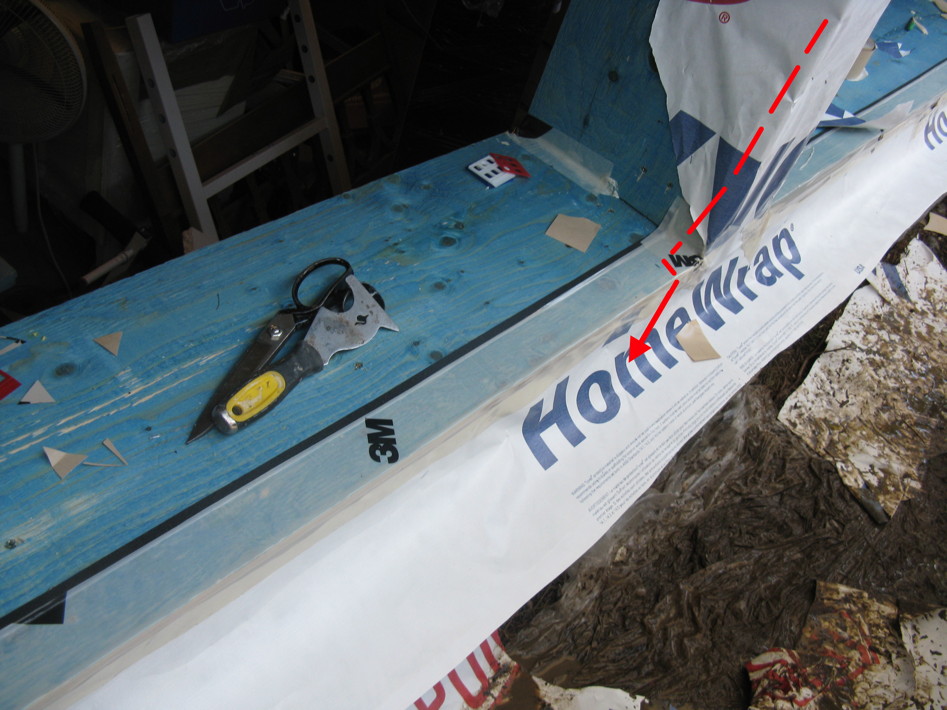
In this window frame, 3M’s recommended method on the left for installing tape on the sill does not allow the WRB (blue dashed line) to overlap on top of the tape (red). This presents a possible method of entry for rainwater as it is not the best drainage strategy. The new method presented on the right allows for drainage from the WRB on top of the sill without potential for water to leak behind.
Here is another advantage of this taped sill: The connection to the jamb includes good overlapping drainage. To solve this, a scrap piece of tape is cut measuring about 6-8″ long. Cut notches in the centre so that the piece of tape resembles a bow tie. The double release paper comes in handy again as it is best to only remove and adhere one side at a time to prevent misaligned accidental taping. Only adhere one side into the corner as show below, and leave the other piece of relief paper on. Using a bow tie method has been used for a long time by many others and works great. The tape can be stretched if need be if there is a misplacement. It is very forgiving that way.
This is how the bow tie piece is placed in the corner. Leave the release paper on any parts that are not adhered at this stage.
The next step involves installing the WRB on top of the rough opening and cutting out the centre. This technique allows the excess to be used to wrap around the jamb and on top of this new piece of bow tie tape we installed. Fine homebuilding has a good succinct video on how to do this. Be sure to temperately tape back any release paper inside the opening so that the WRB can be installed correctly.
Now that the WRB has been installed with staples, it is time to fully adhere the bottom half of the tape on the WRB. The bow tie can also be adhered to the WRB afterwards. The sill pan stage is now finished. Notice how every layer is properly overlapped to ensure proper drainage.
The second half of the release paper on top of the WRB. can now be fully removed and adhered to the WRB. Notice how the wrap that is inside the jam overlaps the inner side of the bow tie.The red dotted line shows the drainage path of water using overlapping layers.
I really like how the flashing installation and final product worked out. I would use this method again in a heartbeat and recommend it to anyone. This is the best of both worlds in comparison to bituthene membranes and preformed pans. They easy to install, fully adhered, and includes a back dam.
Always use a sill that includes a back dam even if it means making your own with a closed cell gasket
Try to purchase tape with two strips of release paper
Practice good drainage by ensuring overlapping layers in the jamb to sill detail
A prefabricated sill may not be easy to acquire when you need it
If you are using sealant, it must be compatible with both your plastic pan and/or WRB or it wont bond properly or possibly melt the plastic
Don’t leave the tape roll on dirty surfaces because the edges will pick up that dirt. This hurts the ability to fully adhere the tape to the surface
The tape works in a wide variety of temperatures which is good for cold weather installs as some sealants have minimum temperatures to cure
The tape is very sticky and can be reattached if misaligned, but not after it has been firmly pressed in place. The elasticity of the tape makes it slightly forgiving
It has been a long time since I last posted for a good reason. I have spent many months renovating my house myself when time was available (with some help from my brother-in-law when needed) and have finally finished only recently. I had taken this opportunity to try out some experimental, some common and some not so common methods of installation of some components. I want to show some of the details that I used in this project, and share what I have learned from them.
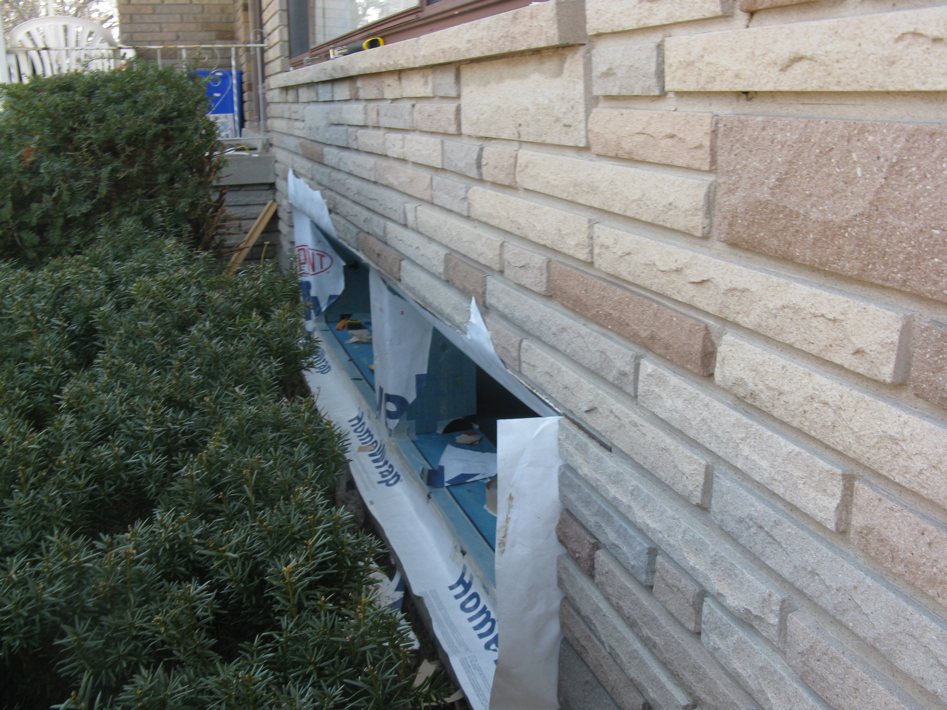
Two window openings using Tyvek Homewrap as the weather resistive barrier. At this stage, the weather resistive barrier was just installed, but not taped completely. This window uses a custom made sill pan out out of flashing tape and a 1/8″ thick closed cell gasket.
These are the two of the most commonly available house wraps available at your big box stores. Although both products are weather resistive barriers (WRB) made from spun bonded-polyolefin method (SBPO), they have a slightly different construction, and therefore different considerations when choosing your house wrap for window openings. There are various types of WRBs which include different features to help you make your choice, but there are also some unpublished or unspoken qualities which make one product better than the other for a particular window installation application, and we will examine these qualities in this article.
The technical background
Tyvek homewrap, made by DuPont:
Polyethylene fibers are fuzed together to form a single material layer membrane.
Permanence: Canada: PERM rating of 30 (1720 ng/Pa S m2) United States: PERM rating of 58 (3320 ng/Pa S m2). 4 months UV exposure max
Can easily break down if your siding or window frames are made with cedar as surfactants are released from the surface and break down the Tyvek material.
This product made by Dupont is the most well known brand name and will charge a premium to use their products.
Typar housewrap, by Polymer Group Inc
Two layer polypropylene fibers with a surface film
Permanence: PERM rating of 11.7 (670 ng/Pa S m2). 6 months UV exposure max
Surfactant and UV resistance, but by how much?
Permanence
I should note, that the real ideal permanence rating depends on the rest of the building enclosure components, indented application, location and weather. In trade literature, both companies claim that their product lies within the ideal performance range. I would like to cut through the marketing to give you the truth.
In theory, the highest permanence material in a cold climate should be ideal, in this case Tyvek. The reason for this is that the WRB is not a primary vapour diffusion control layer, so the least amount of moisture control you induce is the best choice. But in many cases, when I hygrothermally simulated walls in a computer program in various projects, I found the difference of moisture in a wall is usually negligible between the two. In a standard wood framed home with drained and vented cladding, either product will work fine. It is when your building enclosure is slightly different to the norm such as superinsulation, or other non-wood frame buildings is where these numbers seem to matter more. Although I would use Tyvek given the choice, Typar is just as acceptable for our window.
Advantage: Either WRB (depending on application)
Building codes and cedar surfactant release
In some jurisdictions treated lumber is required for window sills. Something I personally think needs to be refined as the lumber frame is neither exclusivity interior or exterior components. Many pressure treated lumber products such as the standard, cheapest ACQ (yellow/green stuff) should never be used indoors. It can have a negative impact on indoor air quality. So you may think, what are my alternatives? Cedar is the first wood that comes to mind, expensive but easily attainable and okay to use indoors. The big draw back is that it can eat away at your WRB due to a chemical incompatibility. Typar advertises that it has resistance to this effect. How well that resistance performs, I don’t know. There are many other wood treatment companies on the market that are made with environmentally sensitivity in mind such as Timbor or MicroPro Sienna, or heat treated lumber. In the old days, people used to paint the frames with white alkyd paint. It seemed to work well.
Are you using cedar shims to level your window? That is chemically incompatible with your SBPO. Time to switch to a composite shim or setting blocks.
Advantage: Either (Typar in special applications)
Folding memory and tear strength of WRB
One quality in which Tyvek has a disadvantage over Typar, is that Tyvek has folding memory. What I mean by this, is during the normal process of install the membranes are always folded back and forth before they reach their final position, especially on a windy day. The final result, is that the Tyvek Homewrap material can begin to resemble a crumpled up piece of paper. Now try to picture using that crumpled up Tyvek and pulling it taught to achieve uniform adhesion when taping joints. It is difficult to do so and takes up a lot more time to try and get it right. Most contractors use staples to adhere WRBs to the substrate. These stapes create holes in your new membrane, and I did see that the Typar definitely had better tear resistance which can potentially reduce driving rain to the interior. The Tyvek staples tended to cut the WRB more and create larger holes in your drainage plane. Not so good. If you use different fasteners with a gasket or flash tape each staple (PITA) and a little OCD. This is one of the biggest issues with Tyvek. For this reason, Typar was preferred by my local window installer.
Advantage :Typar
Flashing your WRB
This quality is probably the most important category in this article. If your sheets of WRB do not adhere well together, and don’t terminate well to other building materials, your WRB effectiveness is severely reduced.
If you are using flashing tape provided by your WRB manufacturer or Tuck Tape, the adhesive layer is really thin, and doesn’t have the best long term adhesion properties. Tyvek is a relatively flat uniform surface, where Typar is a little bit bumpy. This bumpy layer makes it difficult to get good adhesion with the tape. If you don’t use a j-roller or aggressively push down the tape on the tyvek, uniform adhesion coupled with a thin adhesive layer can encourage water to way-find its way through the joint. Since Tyvek is more flat, it is easier to get a better bond. With these tapes, it is sometimes possible to lift up the tape to reposition it on Tyvek, Sometimes a few fibers will break and can be okay as long as it is covered with a new piece of tape. But with typar, the white finishing layer rips off much easier.
This whole problem of flashing tapes can be solved by using a better quality flashing tape with a thicker adhesion layer. 3M 8067 / 3M3015 flashing tape or some made by SIGA, Tescon, or Vycor can solve these issues with an added expense. I would say that in window and door openings when using WRB, these tapes are a must, where the rest of the house, you can get away with tuck tape if it is applied with care.
Advantage: Tyvek (using manufactured supplied or Tuck tape)
Chemical compatibility with sealants under the flange
Knowing that VOCs can cause issues with WRBs, I made the assumption that a low-voc content polyurethane would work better than one with a higher content. I called the manufacture of the sealant who’s technical person said to me that they were compatible. This information was good enough for me at the time. They were not! Lesson learned, always do a test bead and let it set for a few days on your WRB. Chemically incompatible materials will never set properly and can become mushy. On the reinstall, I used DOW Corning 758 which is a silicone specifically made for compatibility with WRB, foams and plastics.
Sill pan
There are many different ways to flash a sill, including flex wrap products, self-adhered membranes, tapes, and plastic pans. A WRB is not a sill pan material as standing water can get through (over time).
Update:
Here is an interesting test done my Matt Risinger for JLConline, showing other budget housewraps with pin perforations. The results are dramatic, but scientifically questionable. In the example in the video, the weight of a glass of water on the membrane could represent a material that is close to fully adhered. In a real world scenario an airspace would not trap water like a piece of glass would. The amount of time the water is in contact with that barrier would be less as the water drains to the ground.. If this test was to test an air space behind cladding, the results would be different. Most importantly, this test only proves that these SBPO materials are not meant to be used as a sill pan material which the glass jar test emulates. Dupont makes a SBPO specifically for a stucco application which could imply that his test really tells us that budget housewraps are not meant for stucco.
For standard wood construction, permanence values should not be a deciding factor on which product to use. For standard 2″x6″ construction assemblies, in most cases hygrothermal simulations that I performed myself have shown that there was a negligible difference between the two in this category.
Folding memory WRBs can be an issue and more difficult to tape and tears easier
Use only quality flashing tape around the window and all other openings.
Always check chemical compatibility of your sealant and your WRB a week before the install if you decide to go down that route rather than using flashing tape which is much better if applied properly.
Housewrap WRBs should not be substituted as a still pan material.
Foundation drainage mats should never rip. Something is a awry here
I was walking near the government of Canada building on Yonge Street when the grass was still green and found this: A completely torn drainage mat. But is this really a serious problem other than an eyesore?
The installers of this waterproofing drainage mat layer secured the flashing termination with concrete screws.
Drainage mat flashing should never bear the weight of the whole mat. The red boxes showed the area that the mat most likely sheared before ripping right below the fasteners
To achieve a nice clean look the termination strip plastic flashing flashing was installed correctly, but er…. someone forgot to fasten the mat below grade with clips.
Instinct may tell you not to poke holes in your new drainage mat below grade, but with a self adhereing membrane underneath, the nails are self sealing. If you you are still concerned, a sealant can be applied around the fastener, but I don’t think it is necessary.
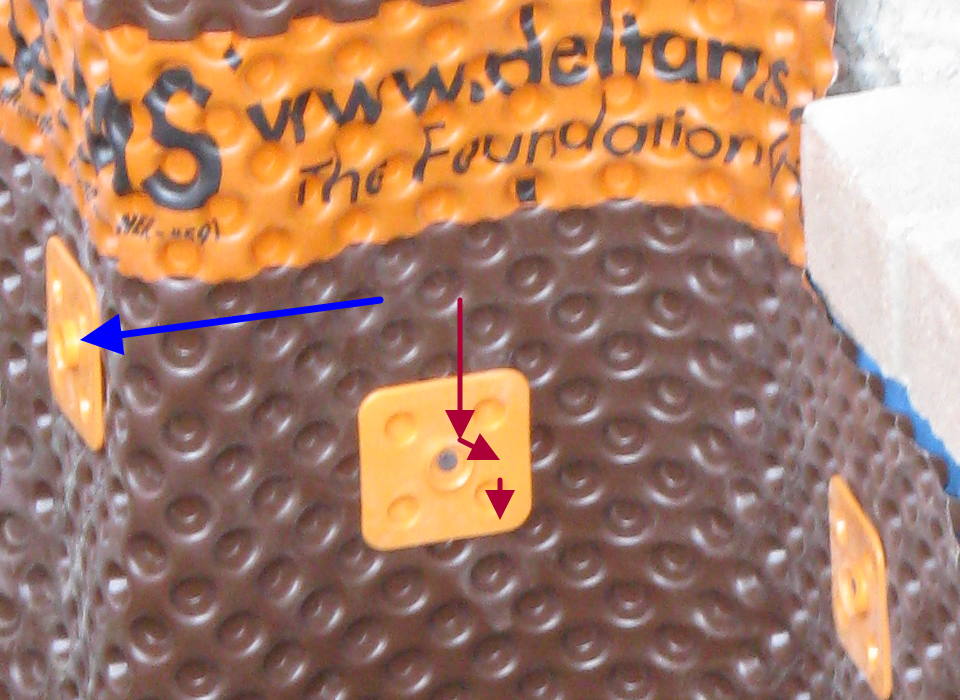
These clips made by Cosella-Dorken have a little plastic rim edge around the fastener location so that any water that passes overtop wound not even touch the nail as shown by red arrows (In theory). The profile of the lip can be seen when looking at the tip of the blue arrow.
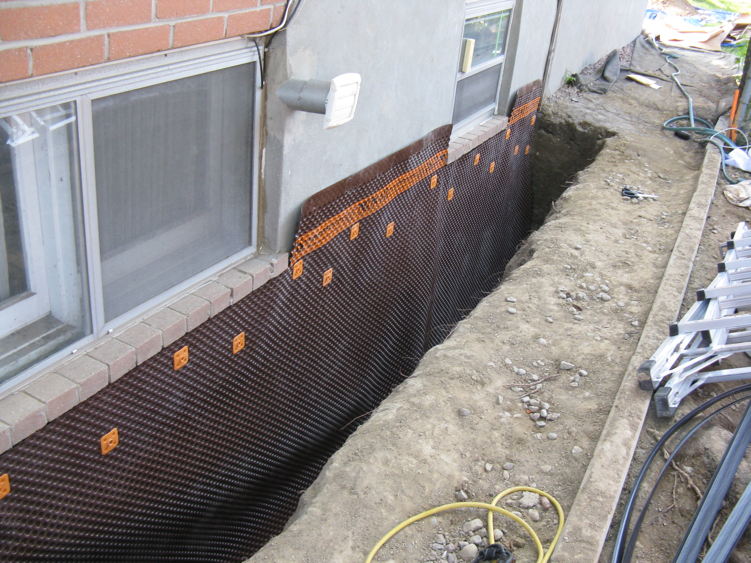
Here is the correct way to support the drainage mat, as shown below. The termination strip has not been installed yet in that picture.
The height of the drainage mat was positioned so that the mat is higher than the grade as a snow covered ground will not wet wall. The orange strip in this mat is helpful in determining the proper position of the mat in comparison to the grade height.
The location of the clips are not critical. It is a good idea to try to not install one directly below a window ledge flashing termination where more water may accumulate.
So does this mean that the installation with the black mat at the top of the page will do harm? Well maybe to the eyes, yes. It depends if there are any fasteners below grade, because those will have ripped too, creating a hole in the mat. But even then, how much water would enter that tear? Keep in mind that the mat covers a large surface area. Another question to ask is how far does the mat slip down? Does it slip down enough to interfere with the weeping tile system? That is a big maybe. It depends on how much settling is taking place.
How did this happen and what could be done?
The soil and/or gravel backfill does settle, and it is the job of the installers to compact the soil with hand tampers every 1 foot or so. When settling occurs, the mat is pulled down with it, and if there is enough support (using the clips), the soil will settle, but the forces wont be strong enough to tear the mat. The soil would then slide down beside the mat instead of tearing it. There will always be settling, but if there if the soil and gravel was tamped well, then the above scenario may not be a concern at all. Resetting the height of the termination strip may eliminate the eyesore if the mat stops settling.
Always support the map with clips below grade and don’t rely on the termination strip for support
If you are concerned about settling, make a small mark on the wall every 6 months, and see if the settling begins to stop